Canvas, images and pixels - things I learned building an 8 bit logo generator

Back to pixels!

During my time off from work, I went back to one of my old passions: pixeling stuff on a Commodore 64. Many years ago (15, to be exact) I created a logo generator that allows you to put together a logo from a charset pixeled on a C64. I wrote this old version in PHP using GD and moved it to use canvas and work client-side some time ago. Now I thought it would be fun to brush this up and play with it. So I created a much more bells and whistles version. You can see the "Logo-O-Matic" online (and the source is of course available on GitHub).

logo generator in action

The features are pretty nice:

In this article, I will explain how I did some of that, repeat some canvas basics and show simpler examples of the editor features. The whole article and demos is hosted on GitHub, so feel free to download and play with the examples. Originally, I planned to create a fiddle for each example, but I have no internet right now.

Canvas basics

The canvas element is a weird one in HTML. It does exactly nothing without JavaScript interaction. So, it's role in markup is to be a placeholder for functionality that is relying on JS. Of course, it is still good to have it in your document as you can provide fallback content inside it.

Quick aside:

"This product uses canvas and needs JavaScript and your browser doesn't support it, upgrade to something useful, you monkey"

Is not something we should consider good fallback content. When I use canvas for animations I tend to provide a static image as the fallback. This not only makes people happier who can not change their browser. It also means that social media sites like Facebook index it and show the image as the thumbnail.

The canvas API is rudimentary, but also powerful. It allows you to paint on the canvas using rectangles, lines, arcs and gradients. It has many ways to manipulate your brush and the fill you are using. Furthermore, it has a dynamic coordinate system, which is quite a brain-teaser the first time you use it. Once you understand it, this is a very powerful feature, though.

For this purpose here, we won't need the whole API, just a few parts of it. The HTML needed for the examples in this article is basic:

<img src="…" alt="dollar">
<button>Copy image to canvas ➜</button>
<canvas></canvas>
    

To work with canvas, you need two things: a reference to the canvas element and one to its context. The reference is there to modify the element itself (for example resize it) and the context gives you the API to modify it.

var canvas = document.querySelector('canvas');
var context = canvas.getContext('2d');
    

The first thing we need to create a logo from an image containing a font set is to modify images. So, let's start there.

Modifying images with canvas

One of the things canvas is good at is modifying images. Anything that is an image can be a data source for a canvas: an img element, a video element or even another canvas. Once you have the data you can manipulate it, either pixel by pixel or using the canvas API.

Caveat: the image must be on the same domain as the code that modifies the canvas because of security reasons. You can work around that limitation by using a proxy to load the image, using CORS or by inlining the image. Another way is to ask users to upload or drag and drop the image. This is what I used in zoom and pick or Remove photo data.

For example, copying a picture to a canvas is as simple as this:

Copy an image

Once you have the image on the canvas you can manipulate it any way you want to using the canvas API. Notice though that there is no state in canvas. Every step is like painting over the original content of the canvas and there is no undo. All you do is manipulate a canvas. You can save and restore the state of the context, for example if you want to rotate the image:

Rotate an image

If the rotation logic is confusing, this image rotation tutorial should make things clearer.

The drawImage() method does not only copy the image, you can also resize it. This is not like resizing an IMG element - which only does this visually. Resizing on a canvas also means you discard or add pixels to the image. It is a real painting process, not a squashing or stretching. To resize an image, all you need to do is to define a different size in the parameters of the drawImage() method:

Resize an image

If all you want to do is to scale the image by a certain factor, you can also scale the coordinate system of the context:

Scale an image

Instead of using the whole image, you can also access parts of it. The drawImage() method allows you to pick a part of the image. All you need to do is to provide a start coordinate and the width and height of the square to copy over. For example to crop the "v" from the canvas logo above, all you need to know where the letter starts and how wide and tall it is. cropping from the main image

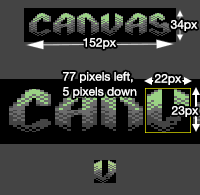
The following example shows how to crop the 'v' from the logo using these coordinates:

Crop image out of larger image

That was the main thing needed to create a logo from a charset. All that was necessary was to know the start coordinate of each letter and the width and height and things fell into place. Another thing I needed, though, was a way to manipulate pixels of the logo to allow for re-colouring.

Reading and manipulating pixel data

Canvas has an API for painting and for copying bits of the canvas, but there is also a much more basic way of interacting with it. Using the getImageData() method of the context you can get the current state of the canvas an an object. This object is simple:

width
the width of the canvas in pixels
height
the height of the canvas in pixels
data
the pixel data. This is an array of numbers, each pixel is four array items: the red value of the colour, the green, the blue and the alpha (transparency). For array value consistency reasons, the alpha is not from 0 to 1 like it is in the RGBA of CSS, but from 0 to 255.

This means you can paint on a canvas by reading, modifying and writing the data array of this object.

Colour analysis using Canvas

You can use this to read the pixel data of an image and run some analysis on it. For example, you could display all the colours used and sort them by amount of pixels.

The logic of analysing the colours used and displaying them by most used to least is:

  1. Create an object for the colours and an array for the sorted colours
  2. Read the pixel data, loop over it with using a loop with steps of four (to iterate over the pixels)
  3. Create a key from the array values (for example $R-$G-$B-$A - where $ are the values)
  4. Store the key in the colours object if it doesn't exist yet - if it already exists, increase its value. This means the colours object will now contain all the colours as keys and have the amount of pixels of that colour as its value.
  5. Sort the object by value using the new Object.keys() method. Call a sort with a comparison function and store it in the "sorted colours" array
  6. Iterate over that array and display it as a list

In JavaScript, this looks the following way:

Count the colours used in an image

Caveat: Notice that this could be slow with large JPG images, but here we deal with a fixed palette of 16 colours and small images. WAlthough the data array is a Uint8ClampedArray it might be safer to use a worker thread to avoid slowing down the browser.

Displaying the colour under the cursor

One of the features people asked for was to have a display of the colour of the current pixel to see which ones the original artist used.

reading the colour under the mouse

This is pretty easy to do:

  1. Read the current mouse position. For this use layerX and layerY of the event object and make sure to position the canvas relatively for this to work.
  2. Get the image data of that pixel
  3. Write this to the background style of the colour display using RGBA

In code, it looks like this (move your mouse over the logo to see the colour of each pixel):

Read colour under mouse cursor

Change pixel values of the canvas

You can not only read but also write this data. Say for example you want to swap the colour of an image around. You can do this by reading the green value and swap it with the red one. The following demo shows how that looks in code:

Shift colours from green to red

We can crop letters from an image, plot them onto a canvas and manipulate their pixels. That's all we need. Next was the task to get from a string to an image.

Defining the letter dataset

To create a logo from an image, I needed to find a way to map a string to coordinates of the image. So, I created a JSON object with all the letters of the alphabet and their coordinates in the font:

var font = {
  height: 15,
  a:[0,15],b:[16,15],c:[32,15],d:[48,15],
  …
  y:[385,13],z:[400,15]
};
    

As all characters in the font are the same height, I didn't need three pieces of information for each. All I need is the start x coordinate and how wide each character is. This allows me now to take a string and loop over each of its characters and assemble a logo. All in all this keeps the data size small, which you can see in the object of the live editor containing some extra meta data for each font.

Assembling the logo itself seems to be pretty simple:

  1. Take a string
  2. Split it into letters
  3. Loop over the array of letters
  4. Read the coordinates from the dataset
  5. Crop letter from the alphabet image and copy it to the canvas

Except, it doesn't work, as you can not extend a canvas. You need to define its size.

Caveat: every time you change the size of a canvas, it gets wiped. This is great when you animate a canvas, but in simple plotting cases it gets annoying. The good news is that if you paint beyond the size of a canvas there is no error - it just doesn't show up. It is a forgiving API, but it expects you to do some calculation work beforehand.

This means that before we do the above, we need to calculate the appropriate size of the canvas. When doing that, we also need to take care of spacing between letters and a border around the whole logo. All in all, the logic to create a right-sized canvas and plot the logo goes as follows:

  1. Take a string
  2. Split it into letters
  3. Loop over the array of letters
  4. Read the coordinates from the dataset and add up all the widths of them
  5. Add to this the letter spacing amount multiplied by the amount of letters
  6. Detract one spacing (as you don't want a space after the last letter)
  7. Add twice the padding (left and right of the logo) and you have the width of the necessary canvas
  8. The height of the canvas is the height of the font plus twice the vertical padding
  9. Resize the canvas and fill it with a background colour (by default, canvasses are transparent)
  10. Set the horizonal padding as the start coordinate to plot letters to
  11. Crop the letter from the image and plot it at the horizontal coordinate and vertical padding coordinate
  12. Add the width of the letter and the letter spacing to the horizontal coordinate and get the next letter

In code, this looks much less complex:

That gives us our logo, but how can users of the logo generator save it?

Saving the image

Once generated, users should be able to save their logo as an image. The simplest way for this to happen is using Firefox, as it allows users to right-click any canvas and save it as a PNG image. This kind of makes sense, as a canvas is nothing but a dynamic image, but not all browsers support this.

To create a downloadable version of a canvas, the first thing to do is to convert the canvas to a data URL. This is simple to do, by calling the toDataURL() method on the canvas element. This one needs a MIME type to convert the canvas to.

canvas.toDataURL('image/png')
generates a PNG image. This is lossless, but can result in huge images
canvas.toDataURL('image/jpeg', quality)
generates a JPG image. The quality ranges from 0 to 1, with 1 being the best quality and largest image and 0 being almost unrecognisable but small in file size

The following demo shows the data URL, the file size and a preview of what the saved image looks like when you click any of the images. You can turn JPG generation on and off and change the quality of the JPG. As there is no real gain in file size when generating JPGs from these small pixel images, I also added a free horse to play with.

Images to dataURL

The excellent download attribute

One of the most useful features of HTML5 is also one of its most unsung: the download attribute. This one allows you to define a file name that the browser will download a file as. So, if you added the following link to a document, clicking it would not redirect the browser to the image but instead prompt the user to download it as fabulous-unicorn.png:

<a href="img/213rso.png" download="fabulous-unicorn.png">ZOMG! Free Unicorn!</a>

Try it here. Why wait? Free unicorn!

This means that to enable people to download a canvas as an image all you need to do is have a link in the document with a download attribute and the href value of the canvas as a dataURL. You can generate this one dynamically, as the following example shows. Go and paint something on the canvas, click the "download image" link and you are the proud owner of a PNG of the your painting called mypainting.png.

Make image downloadable

This is incredibly useful. You could just wrap your canvas in a link and change the href of that one every time you change the canvas. Clicking it prompts the user to save the image. The following example does this. The HTML of the canvas is:

<a href="#" download="dummy.png"><canvas></canvas></a>

Wrap canvas in link

Workaround for lacking download support

Caveat: at the time of this publication, Internet Explorer does not support the download attribute. You can use Eli Grey's FileSaver.js or you can open a new window with the dataURL as the location. Or you can generate an image and asking the user to download it.

In the following example, we do the latter. We take the image, put it on a canvas and shift the colours (the same way we did in the "change pixel values of the canvas" example earlier). We then replace the original src of the image with the dataURL of the canvas. That way we leave it to the user to save the image. The main annoyance here is that the image always gets the same name as the document file name - in this case index.png.

Hacking around lack of download support

This is all I needed to make the logo generator work. What follows now are the cherries on top.

Extra functionality

Zooming

One of the coolest things to do with pixel art is to zoom in and see the details. Especially on a platform as limited as the C64 this can be insightful. Anti-aliasing, dithering, gradients - you need to simulate those with 16 colours, 3 of which you could use every 8×8 pixels. That's why people wanted a zoom function on the logo editor and this is what it looks like: zooming the logo

This is pretty straight forward. We get the position of the mouse and crop an image of - for example - 5 pixels left and above to 5 pixels right and below. Then we copy that one over to another canvas and resize the image to the size we want it to.

We need a second canvas with enough space to show the zoomed version. We read the mouse position like we did before in the colour display example. In the zoom canvas we resize a 10×10 pixel crop of the original canvas to 200×200. The following example shows how that's done:

Zooming - washed out

Alas, this looks terrible as the canvas tries to be good at resizing and smoothes the resized image. Whilst this is prettier for, let's say photos, it is ugly for pixel art. You can force a canvas to not smooth pixels by setting the imageSmoothingEnabled property of the context to false. Notice that this needs prefixes for browsers. The following example sets this property and voilà, our zooming is much more pixelated - just the way we want it:

Zooming - pixelated

Caveat: Sadly, Internet Explorer does not support this feature for versions older than IE11 which might make it necessary to do the zoom by hand. To do this, all we'd need to do is to read the pixel array of the cropped image and write out larger rectangles of these colours. I've used that technique in the Zoom and Pick tool (source available here).

Changing logo colours

As not everybody was happy with the original colours of some of the fonts, I thought I'd offer a possibility to change them. You can replace existing colours by clicking them and picking one of the 16 preset ones: changing the colours of a logo

This uses a combination of detecting the colour under the mouse cursor and altering the pixel array of the context. There are two events we listen for on the canvas this time: click and mouseover.

When the user moves the mouse we do the same as we did in the "Displaying the colour under the cursor" example earlier:

  1. Get the x and y position from the layerX/layerY property of the event
  2. Get the image data of that pixel from the context
  3. Change the style of the display element to the RGBA value of the pixel

(In the following example this is the readcol() function. I also created a reusable getpixelcolour() function. This one reads the mouse position and returns the current colour under it.)

When the user clicks the canvas we do the following:

  1. Get the x and y position from the layerX/layerY property of the event
  2. Get the image data of that pixel from the context
  3. Loop over all the pixels of the array and compare each RGBA value with the one we read in step 2
  4. If they are similar, change them to the colour we want (red in this case, or 255,0,0,255)
  5. Make the change to the canvas by writing the altered pixel array to the canvas using putImageData()

(In the following example this is the replacecol() function.)

You can see this in action in the following demo, just click any pixel to change all the pixels of that colour to red:

Changing logo colours

In the live editor this is a bit more complex, but not much. Instead of changing the full pixel array I store the pixels of the picked colour in a cache and re-write that. This allows to change the colour several times rather than only once. As I have no hard-wired RGBA value, I detect the correct replacement colour with an event handler on a palette list. If you look at the example animation above you also see that I highlight the colours used in the logo. This is the same functionality as the colour analysis demo earlier. Again, if you do this with larger images with lots of colours, this can get slow, so it might be prudent to use a worker thread.

Generating the font dataset

When I got more and more fonts, it got a bit tiring and time consuming to create the font dataset by hand in photoshop (and it was error prone). That's why I thought of a way to generate the dataset from the image. This wasn't hard. As the pixel fonts I use have a fixed amount of colours (16 to be exact) all I had to do is use a colour that isn't used to separate the letters. Much like a green screen works in the movies.

In the case of the font used here, this looks like this: Font with green separator lines

You can also see this in the live canvas image of the logo generator at the newer fonts on the bottom: 4000×4000 pixel PNG, ~450KB.

All I have to do then is to read the pixel array of one line of the the image and loop through it, pixel by pixel:

  1. If the current pixel is not green, I increase the letterwidth value.
  2. If the current pixel is green, I am at the end of a letter.
  3. I then add the information to the dataset using the current letter in the alphabet as the property.
  4. I get the start coordinate of the letter by substracting the letterwidth from the loop iterator divided by 4. Remember, as each pixel has 4 values - R, G, B and A.
  5. I increase the letter counter by one, moving ahead in the alphabet array when the letterwidth is more than one. This prevents wrong assignment when there is more than one green pixel line between letters.
  6. I reset the letter width to 0, as I am still on a green line and the next letter hasn't started yet.

In the live logo generator I also need to provide a starting point, as I keep all fonts in one image. This is not necessary here.

You can see this working and the source code in the following example:

Generate dataset

SYS 64738

That's all there is to this article. Nothing ground-breaking or earth shattering. No new library to use, NPM module to install or Grunt plugin to add. Just some fun with JavaScript and explanations. I enjoyed coding this and cleaning it up and I hope you learned something from it. Now go and create some cool logos.

This is on GitHub, so if you want something changed or have some questions, don't be shy and file an issue. You can also reach me on Twitter as @codepo8.